Ağdan Önyükleme (PXE) Nedir ve Nasıl Kullanılır?

Hiç sorunlu bir bilgisayarda sorun gidermeye veya tanılamaya ihtiyaç duydunuz mu ve yardımcı program CD'sinin nerede olduğunu unuttunuz mu? Bu sorunu geçmişte bırakmak için FOG ile ağ önyüklemesini (PXE) nasıl kullanacağınızı göstereceğiz.
Resim h.koppdelaney tarafından
PXE'ye Genel Bakış
PXE (Ön eXecution Environment), sevgiyle Pixie olarak telaffuz edilir (peri tozunda olduğu gibi), yalnızca ağ kartını kullanarak bir son bilgisayar (istemci) önyüklemesine sahip olma yöntemidir. Bu önyükleme yöntemi 1999'da çok eskiden oluşturuldu ve söz konusu bilgisayar ağa bağlı olduğu sürece (ve bu standardı desteklediği sürece), normal önyükleme prosedürünü atlatmak mümkündür (IE Power on -> BIOS -> HD / CD) ve sorun gidermeden liveOS kullanmaya ve hatta makineyi yeniden görüntülemeye kadar bazı güzel şeyler yapın… ama biz kendimizi aşıyoruz, başa dönelim.
PXE kullanılırken, önyükleme işlemi normal sıradan şu şekilde değiştirilir:
Gücü açın -> BIOS -> Ağ Kartının PXE yığını -> Sunucudan İstemcinin RAM'ine TFTP kullanılarak indirilen Ağ Önyükleme Programı (NBP) -> NBP'nin bir sonraki adımı gerçekleştirme sorumluluğu (aka 2. aşama önyükleme).
"PXElinux" NBP'yi kullanarak, sunucuyu istemcilerimiz için birden fazla PXE önyükleme programı için ayarlamak mümkündür. Bir anlamda, yukarıdakilerin hepsini ve sonra bir kısmını gerçekleştirmemizi sağlayan gizli bileşendir. Tüm sürecin, geçmişinin ve onun ve daha gelişmiş bir kuzen olan gPXE'nin sağladığı bazı altyapı seçeneklerinin daha derinlemesine bir açıklaması için, geliştiricilerinin YouTube'daki bu dersine bakın. Ayrıca, aşağıda bazı önyükleme olasılıklarını hızla aşan 2008'den bir kurulumun videosu bulunmaktadır.
Hedef
Bu kılavuz, PXEing ile ilgili bir dizi kılavuzun ilkidir. Bu kılavuzda, ilerideki makalelerde üzerine inşa edeceğimiz temelleri atacağız.
Öneriler, Varsayımlar ve Ön Koşullar
- Test ettiğiniz istemci makine, PXE önyüklemesini destekler ve bunu nasıl etkinleştireceğinizi bilirsiniz.
- Bu kılavuz Debian Squeeze, Ubuntu sunucusu 9.10 ve Linux Mint10 kullanılarak yazılmış ve test edilmiştir. Bu nedenle, çalışabileceğiniz Debian tabanlı bir sisteminiz olduğu varsayılır.
- Basit bir Dosya Sunucusu için Yazılım RAID Kurulumu ve Ağ Bağlantısı Birleştirme (802.3ad) Nasıl Kurulur konularına bir göz atmak isteyebilirsiniz, çünkü bu tür bir sunucudaki disk ve ağ bant genişliği talepleri gerçekten çok hızlı olabilir. Ağı ve disk alt sistemleri için yüksek esnekliğe sahip bir sunucunun temelini oluşturması şiddetle tavsiye edilir.
- Editör programı olarak VIM kullandığımı göreceksiniz, bu sadece alıştığım için… İstediğiniz başka bir düzenleyici kullanabilirsiniz.
Kurulum - FOG'dan yararlanarak ağır kaldırma
FOG, * Chuck Syperski ve Jian Zhang tarafından oluşturulan ücretsiz, açık kaynaklı bir bilgisayar klonlama çözümüdür. FOG, düzenli olarak bulunan yazılımları (birkaçından söz etmek gerekirse Apache, MySQL ve tftpd-hpa gibi) alır ve bunları ücretsiz ve ürünleştirilmiş bir PC Yaşam Döngüsü yönetimi (PCLM) çözümünde paketler. Bu ücretsiz PCLM'yi kullanarak, bir bilgisayar durumunu görüntüleyerek, programları ve ayarları (IE Firefox, Office, Yazıcılar vb.) Ve yapılandırma politikalarını (IE otomatik oturum kapatma ve ekran koruyucu ayarları) kullanarak yedeklemek mümkündür. merkezi web arayüzü.
Not : Chuck ve Jian ile FOG hakkında bir röportaj Tightwad Tech'te mevcuttur.
PXE sunucunuzun temeli olarak FOG'u kullanmak, TFTP gibi gerekli tüm parçaların ve gerekirse DHCP'nin manuel olarak kurulup yapılandırılmasına gerek kalmadan yerinde olması için harika bir kısayoldur ve size tüm FOG'un işlevselliğini bir bonus olarak verir .
Amacımız bu zaten harika sisteme işlevsellik katmak olduğundan, FOG'un nasıl kullanılacağını veya kurulum prosedürünü derinlemesine ele almayacağız. FOG'un wiki'si, yazılı ve video nasıl yapılır bilgileriyle, derinlemesine bilgi almak için yeterince sağlamdır, eğer bununla uğraşmak istiyorsanız. Özetlenen adımlar şunlardır:
sudo mkdir -p /opt/fog-setupDownload the latest FOG packagefrom sourceforge to the directory created in the previous step.Extract the package and start the installation.sudo tar -xvzf fog*You will be prompted several times by the installer:
3. What is the IP address to be used by this FOG Server? [server-IP-detected-on-eth0] – Enter.
10. Acknowledge and follow the on screen instructions for “MySQL“.
11. Leave the MySQL password blank for the root account.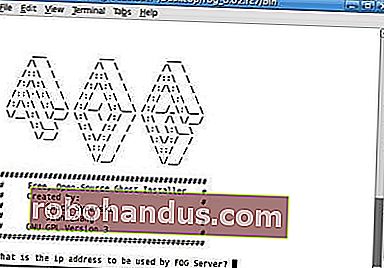
Image from the FOG wiki.Go to the Fog address with your browser and follow the on screen instructions.

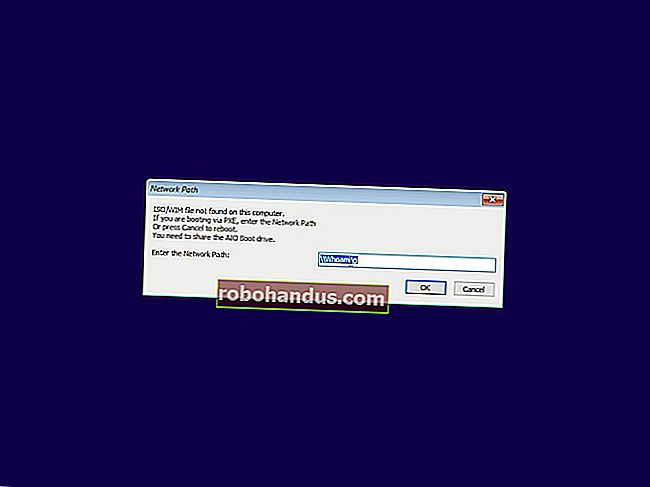
*Note: Assuming you do NOT have another DHCP or that it is not setup to handle PXE. If you want to configure your existing DHCP, see Configure DHCP for PXE.
As far as installing FOG goes, that should be it. Again, while FOG is a great system, using it, is not the focus of this guide, and we encourage you to head over to it’s wiki so you can get a better grasp of FOG’s abilities and how it can help you to manage your clients lifecycle.
If all when well you should be able to PXE boot your client machine (usually F12) and get greeted by FOG’s default menu.

As a quick “taste of things to come” you may select the “Run Memtest86+” option and get greeted by the Memtest program we covered in our “Diagnose PC Hardware Problems with an Ubuntu Live CD” guide.
File and directory Structures
As stated earlier, our aim is to extend FOG’s abilities and to that end we will need to add some files and directories.
Create the subdirectory structure:
sudo mkdir -p /tftpboot/howtogeek/menus
These sub-directories will serve as templates for all the pictures, programs and configurations we will use to extend FOG.
Adjusting the “default” configuration file
We will build a new main menu, and put all of the FOG functions into their own sub-menu.
Copy the /tftpboot/pxelinux.cfg/default configuration file into howtogeek/menus/fog.cfg
sudo cp /tftpboot/pxelinux.cfg/default /tftpboot/howtogeek/menus/fog.cfg
Now edit the content of the original “default” file:
sudo vim /tftpboot/pxelinux.cfg/default
Make its content look like this:
DEFAULT vesamenu.c32
LABEL FOG
KERNEL vesamenu.c32
APPEND howtogeek/menus/fog.cfg
LABEL Utils MENU
LABEL Linux
LABEL fog.local
When we finish, this configuration will give you 3 sub-menus: “Utilities”, “Manual FOGing”, “Linux stuff”.
Create the “master” file
The master file allows us to make global changes to the look and feel of the menus without reentering them individually over and over. Things like the default background picture, border stile, position Etc’, will all be consolidated in this master.cfg file.
Create the file:
sudo vim /tftpboot/pxelinux.cfg/master.cfg
Make it’s content look like:
MENU BACKGROUND fog/genie.png
MENU MARGIN 0
The configuration above, will create the purple borders and highlighting, if you whish to have a different look and feel, simply change the values.
To set a background picture, put a picture in the “/tftproot” directory and point the “MENU BACKGROUND” to the picture’s relative path (we recommend using pictures with resolution of 640*480). For example the full path for the above configured picture would be: “/tftproot/fog/bg.png“.
Connect the FOG sub-menu to the main menu
Because we made a simple copy of the original configuration file into the menus sub-directory (keeping its color schema, timeouts and alike), if you go into this sub-menu now from the PXE booted client, it would work, but you will not be able to return to the main menu without rebooting the machine.
So edit the /tftpboot/howtogeek/menus/fog.cfg file:
sudo vim /tftpboot/howtogeek/menus/fog.cfg
Add this entry after the “menu color title” entry and before the FOG functions:
LABEL back
Create the sub menu skeletons
We have created 4 sub-menus, three of them are up to us to fill. To do so, lets create the template that we will be building on.
Create the template file:
sudo vim /tftpboot/howtogeek/menus/template.cfg
Make this its content:
MENU INCLUDE /pxelinux.cfg/master.cfg
Lets set the stage for additional sub-menus, which will be covered in future guides:
cd /tftpboot/howtogeek/menus/
That’s it, the basic layout is now ready and from now on, we only need to build upon it, which we will in future guides. Until these future guides arrive, you are encouraged to get familiar with FOG as it is an exciting ride upon it’s self.
Update: The future is here :)
How To Network Boot (PXE) The Ubuntu LiveCD
Go FOG yourself 
Original text